When flying, much of the focus is often on the skies, but there’s a lot to consider when navigating an aircraft on the ground. Taxiing safely between runways and gates is just as important, and that’s where understanding taxiway signs and markings comes in. Whether you’re a pilot, a student learning the ropes, or an aviation enthusiast, knowing these markings ensures safety and efficiency during ground operations.
In this post, we’ll go through the essential taxiway signs and markings, explaining their purpose and how they help pilots navigate the airport grounds.
- Taxiway Edge Markings: Keeping You on Track
- Non-Movement Area Boundary Marking: Defining Controlled and Uncontrolled Zones
- Taxiway Centerline: Guiding Your Path
- Taxiway Direction Signs and Taxiway Location Signs: Directing the Way
- Taxiway Holding Position Marking: Preparing for Intersections
- Enhanced Centerline: A Safety Measure Before Runway Entry
- Runway Holding Position Marking: Stopping Before the Runway
- Runway Holding Position Sign: Clear Communication with ATC
- Additional Markings and Signs: Enhancing Airport Safety
- Conclusion: Stay Safe by Understanding Airport Markings
Taxiway Edge Markings: Keeping You on Track
Taxiway edge markings are crucial for defining the boundaries of the taxiway. These markings are typically yellow, and they can either be solid or dashed lines.
- Solid Yellow Line: This line marks the edge of the taxiway. It is a boundary that should not be crossed by the aircraft.
- Dashed Yellow Line: This marking indicates areas where aircraft can safely cross. It’s commonly used in less critical areas.
Knowing when to cross and when to stay within these boundaries is essential for preventing accidents and ensuring smooth taxiing.
Non-Movement Area Boundary Marking: Defining Controlled and Uncontrolled Zones
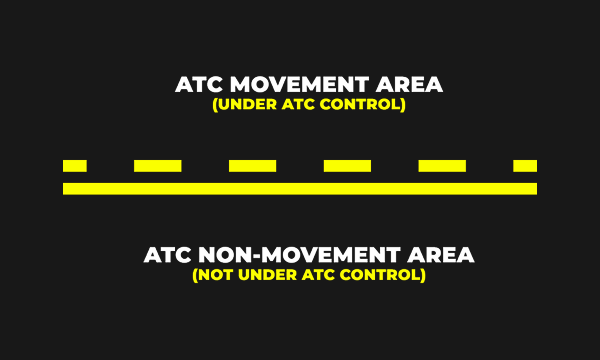
The non-movement area boundary marking separates areas where aircraft can move freely (movement areas) from those where they cannot (non-movement areas). This marking usually consists of a solid and a dashed yellow line.
- Solid Line: Indicates the boundary between controlled and uncontrolled areas.
- Dashed Line: Permits crossing into a non-movement area with ATC clearance.
Understanding this marking is vital for maintaining communication with air traffic control when crossing between these zones.
Taxiway Centerline: Guiding Your Path
The taxiway centerline is a solid yellow line that runs down the middle of the taxiway. Pilots are expected to stay on this line as they taxi to ensure a safe distance from obstacles and other aircraft. By following the centerline, pilots can keep the aircraft properly aligned and avoid accidents during taxi operations.
Taxiway Direction Signs and Taxiway Location Signs: Directing the Way
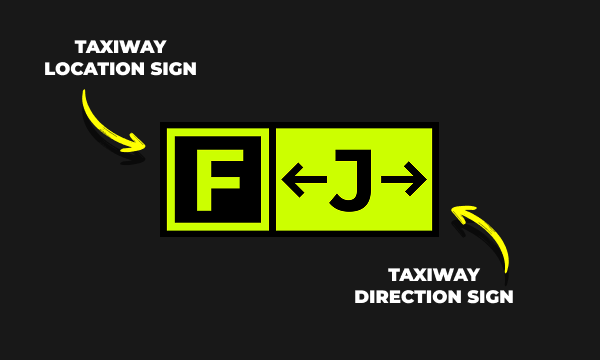
Taxiway direction signs help pilots navigate the airport by providing directions to specific taxiways. These signs are yellow with black text, and they clearly indicate which way to go.
- Taxiway Location Signs are black with yellow text and display the specific taxiway that the pilot is on. These signs help maintain awareness of your current position on the airport surface.
These signs are critical for navigating large airports where there are multiple taxiways leading to runways and gates.
Taxiway Holding Position Marking: Preparing for Intersections
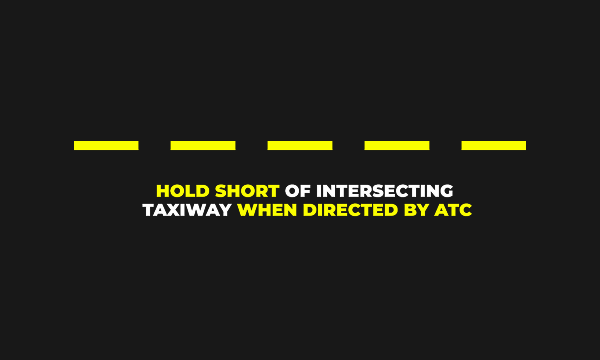
The taxiway holding position marking is one of the most important ground markings for pilots. These markings, typically a single dashed yellow line, appear at intersections where taxiways meet. Pilots are required to stop before these markings unless cleared by air traffic control to proceed. The holding position ensures that aircraft do not block other traffic or create hazards when turning onto another taxiway.
Enhanced Centerline: A Safety Measure Before Runway Entry
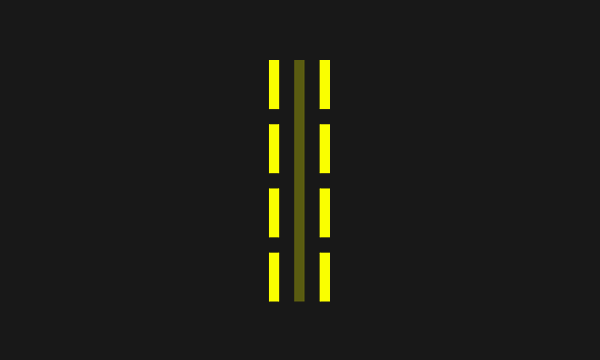
Before approaching a runway, pilots may encounter the enhanced centerline marking. This consists of dashed yellow lines on either side of the regular centerline and alerts pilots that they are approaching a runway holding position. It’s designed to improve situational awareness, especially when visibility is low or when pilots are nearing a critical area.
Runway Holding Position Marking: Stopping Before the Runway

As aircraft approach a runway, they will encounter the runway holding position marking. This marking consists of two solid yellow lines and two dashed yellow lines across the taxiway. It is usually located where a taxiway intersects with a runway. Pilots must stop at this marking and wait for clearance from ATC before entering the runway. This ensures that aircraft are not on the runway without authorization.
Runway Holding Position Sign: Clear Communication with ATC
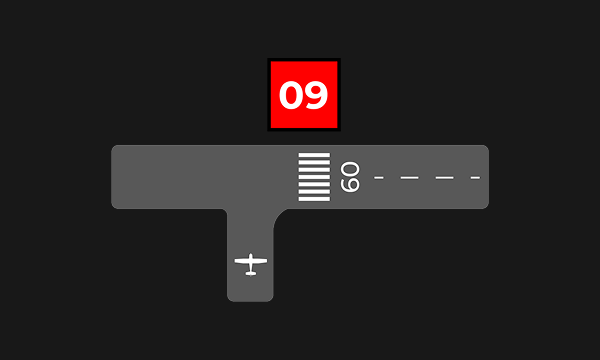
The runway holding position sign is a red sign with white text, showing the runway number. It is typically placed at a holding position where an aircraft needs to wait before entering the runway. Pilots must communicate with ATC before proceeding past this sign to ensure that the runway is clear for takeoff or landing operations.
Additional Markings and Signs: Enhancing Airport Safety
There are several other important markings and signs that pilots need to be aware of:
- Runway Guard Lights: Flashing yellow lights are located at runway intersections to increase visibility and alert pilots to the location of the runway.
- ILS Hold Line: This set of yellow ladder-like markings is found near the runway threshold and helps protect the instrument landing system (ILS) signal.
- Closed Taxiway or Runway Markings: These X-shaped yellow or white markings indicate that a taxiway or runway is closed. Pilots should not attempt to use closed taxiways or runways.
Conclusion: Stay Safe by Understanding Airport Markings
Understanding the essential taxiway signs and markings is crucial for safe ground operations. Whether you’re taxiing to a runway or navigating a busy airport, being familiar with these markings can help you avoid accidents and ensure smooth operations. Always stay aware of your surroundings and follow the guidance of air traffic control to keep your flight safe from the ground up.